Introduction
Unity stands as a leading platform in the world of game development, offering developers a robust and versatile environment to bring their creative visions to life. At the heart of this platform lies the Unity Asset Store, an invaluable resource brimming with thousands of pre-packaged assets, from 3D models to sounds, ready for integration into projects.
Assets are not just ‘add-ons’ or ‘extras’ – they are foundational. The right choice of assets can elevate a project from ‘good’ to ‘outstanding’. Be it graphics, music, or scripts, assets can significantly cut down development time, allowing developers to focus on game logic and gameplay. In this light, understanding how to navigate, select, and efficiently import assets from the Unity Asset Store becomes crucial for any Unity developer, be they novice or veteran.
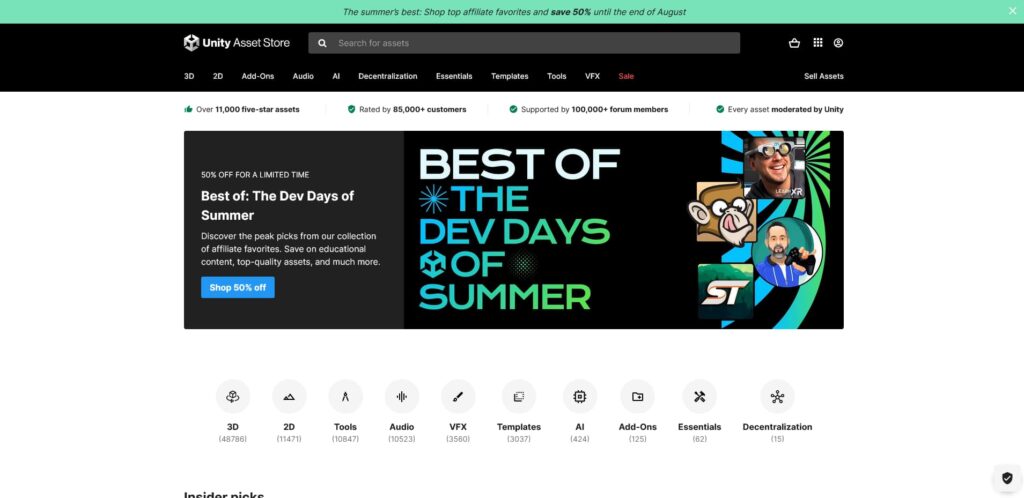
Accessing the Unity Asset Store
The Unity Asset Store is a treasure trove for game developers, but accessing its wealth of resources starts with knowing where to look. Here’s how:
Finding the Unity Asset Store: It’s directly integrated within the Unity interface, but can also be accessed through any web browser by visiting the Unity website and navigating to the Asset Store section.
Creating an Account: If you’re new to Unity, you’ll need to create an account to make the most of the Asset Store. Simply follow the sign-up prompts, providing necessary details and setting up a secure password.
Logging In: For those who already have a Unity account, accessing the Asset Store is even more straightforward. Click on the ‘Login’ button at the top right of the Asset Store page, and enter your credentials. Once logged in, you’re ready to browse, purchase, and download the assets that best fit your project’s needs.
Navigation and Search
The plethora of resources in the Unity Asset Store might seem overwhelming, but with the right navigation and search techniques, finding the perfect asset becomes a breeze. Here are some steps and tips to make your search efficient:
Using the Search Function: The search bar is your primary go-to. Type in specific keywords related to the asset you’re after, such as “3D models”, “sound effects”, or “scripts”.
Filtering Results: Once you’ve got your results, use the filters to narrow down your selection. You can filter by price, popularity, rating, and release date, among others.
Pay Attention to Ratings and Reviews: High-quality assets often come with high ratings and positive reviews. Reading through the feedback can give you a clear idea about the functionality and quality of the asset.
Leverage Categories and Collections: The Unity Asset Store is divided into categories and thematic collections. Browsing these sections can help you discover resources you might not have known you were looking for.
With targeted searching and effective use of filters, you’ll be navigating the Unity Asset Store like a pro, pinpointing ideal assets for your projects in no time.
Purchasing and Downloading
Within the Unity Asset Store, besides browsing and searching, it’s crucial to understand how to make purchases and handle downloads. Here’s a step-by-step guide and some tips to make the process seamless:
Guide to Purchasing: Once you’ve located the asset you desire, click on the “Add to Cart” button. When you’re ready to finalize your purchase, access your cart and follow the instructions to complete the transaction, inputting payment details and confirming the order.
Downloading Free Assets: Many assets in the Unity Asset Store are available for free. For these, the process is even simpler: instead of an “Add to Cart” button, you’ll see a “Download” option. Click on it, and the asset will be added directly to your library.
Locating Your Downloaded Assets: After purchasing or downloading an asset, you’ll find it in the “My Assets” section of your Unity account. From here, you can easily download it and integrate it into your Unity project.
Understanding these steps and knowing where to find the assets you’ve selected will enhance your Unity Asset Store experience, streamlining your game development journey.
Importing Assets into Unity
Acquiring assets is only half the battle. The ultimate aim is to incorporate them into your Unity project, and for that, understanding the import process is paramount. Below is a detailed breakdown on how to effectively bring assets into the Unity development environment:
Starting and Accessing Your Unity Project: Firstly, launch Unity and open the project where you intend to embed the new assets. Ensure you’re running a Unity version compatible with the assets you’re about to import.
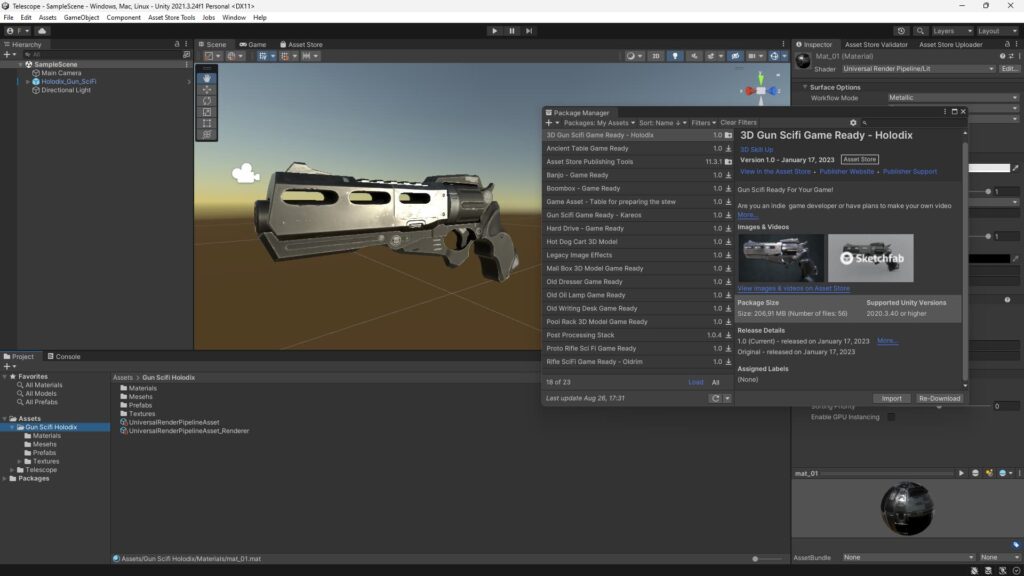
Navigating to the Package Manager: The Package Manager is your central hub for managing your project’s resources. Locate it on the menu bar by selecting “Window” and then “Package Manager.”
Step-by-Step Import Procedure:
- Inside the Package Manager, look for the “My Assets” section.
- Here, you’ll see a list of assets you’ve purchased or downloaded. Click on the desired asset to view its details.
- There will be an “Import” button. Clicking on this initiates the import process.
- At this juncture, you’ll be given the option to select specific files from the asset. This is helpful if you don’t wish to import the entire package.
- After selecting the desired elements, hit “Import” or “Finalize Import” to complete the process.
Organizing Assets: Once assets are imported, effective management within your project is crucial. Create dedicated folders for different types of assets (e.g., Models, Audio, Textures) to keep your development environment tidy. Employing descriptive names and consistency in naming can save you ample time in later stages of development.
Effective asset import and organization are foundational for smooth game development. Familiarize yourself with these processes to maximize your efficiency and mitigate hitches along the way.
Troubleshooting Common Issues
In the realm of programming and development, facing hurdles is inevitable. When it comes to importing assets into Unity, certain typical challenges may arise. Here’s a guide on how to tackle these common issues and where to seek help:
- Common Import Errors:
- Asset Compatibility: Sometimes, the asset might not be compatible with the version of Unity you are using. Always ensure to check the asset’s information before purchasing or downloading.
- Missing Files: If you receive a message indicating missing files, there might have been an issue during the download. Consider downloading the asset again.
- License Errors: If you face issues related to the asset’s license, ensure that you have indeed purchased or downloaded the asset from the Unity Asset Store and that there are no restrictions on its use.
- Seeking Support and Assistance:
- Unity Forums: The Unity community is vast and highly active. Unity forums are a great resource to seek help or solutions to specific problems.
- Unity Documentation: Often, the solution to your issue might have already been discussed in Unity’s official documentation. It’s always worth checking out.
- Online Groups and Communities: Numerous groups on platforms like Reddit, Discord, and others exist where Unity developers share their experiences and offer advice.
Facing challenges is part and parcel of every developer’s journey. However, with the right resources and a supportive community, these issues can be successfully overcome.
Conclusion
Importing assets into Unity might seem challenging, but with the right steps and strategies, the process can become second nature. We’ve walked through accessing the Unity Asset Store, navigating and searching for desired assets, and addressing common hurdles. But the beauty of Unity also lies in its vast community and the plethora of available resources.
If you’re new to Unity, we strongly encourage experimentation. Every asset can add invaluable worth to your project, and the Unity Asset Store is a treasure trove of ready-to-use resources. Don’t just stop at importing; explore, create, and let your imagination lead the way.
References and Useful Links
- Unity Asset Store – Official Site
- Unity Forums: The perfect place to share doubts, issues, and solutions with the global developer community.
- Additional resources and tutorials can be found directly on Unity’s official website and on external platforms. Don’t hesitate to search and join the discussions!
Remember, the Unity community is vast and always ready to help. Best of luck and happy coding!
Some of the images used in this article could be taken from the respective sources’ websites and used in a legal and appropriate manner. However, if you believe that the use of any of these images violates your copyright or intellectual property rights, please contact us to resolve the issue. We are committed to respecting copyright laws and promoting the legal sharing of content.
Share this Blog Post with Your Friends!
Facebook
Twitter
Pinterest
Email
LinkedIn

