Introduction
Welcome to the wonderful world of 3D printing! If you’re reading this article, it’s likely that you’ve already heard about Blender, one of the most powerful and versatile software available for creating 3D models. But did you know that Blender is also an invaluable ally when it comes to 3D printing? Yes, you heard it right. Blender can be your trusty travel companion, from the conception of the idea to its physical realization through 3D printing.
In this article, we’ll delve into the details of how to use Blender for 3D printing. We will explore its features, discuss how to create 3D models and convert them into STL files ready for printing. We’ll examine why Blender is an excellent choice for anyone involved in 3D printing, presenting the best online courses to master this tool.
We will also tackle preparing STL files and 3D printing with Blender, delve into the differences between Blender and FreeCAD, and discuss the importance of the 3D printing toolbox and the various plugins available for Blender. We will explore Blender’s compatibility with Cura, one of the most popular slicing software, and finally provide solutions to the most common problems you might encounter.
So, are you ready to explore the potentials of Blender for 3D printing? Grab a coffee, get comfortable, and let’s start this journey together!
What is Blender?
Blender's Features for 3D Printing
When it comes to 3D printing, Blender is equipped with a set of features that make it an excellent option for anyone interested in this emerging technology.
First and foremost, Blender offers powerful 3D modeling tools, which allow for the creation of detailed and accurate models. These tools encompass everything from extrusion and surface modeling to digital sculpting, all with a high degree of control.
Furthermore, Blender supports the creation of complex meshes, providing users with the ability to create detailed and custom geometries, essential for crafting 3D models for printing.
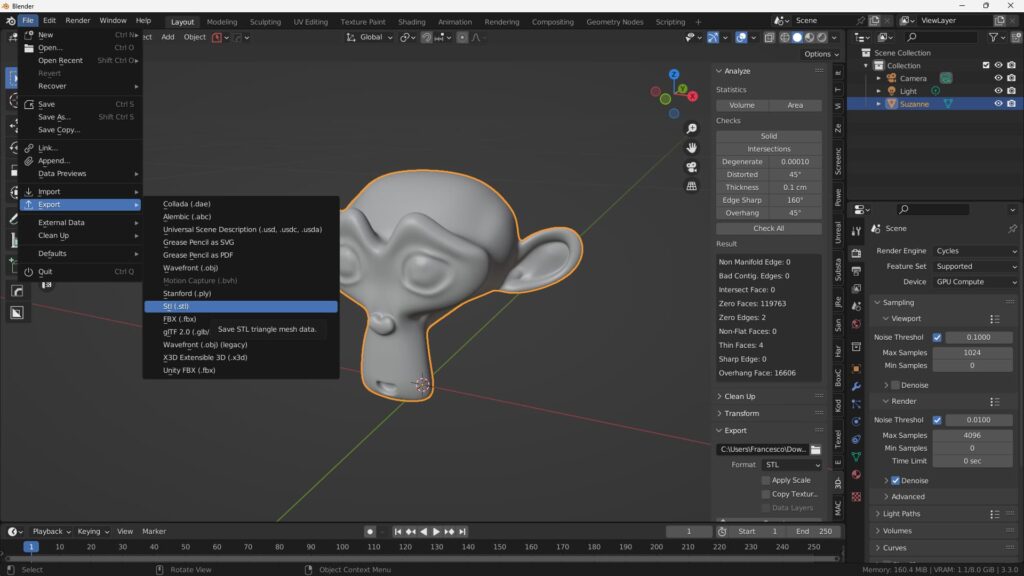
Blender can also export 3D models in STL format, a file format commonly used in 3D printing. This allows you to take the model you’ve created and prepare it for 3D printing in a breeze.
Last but certainly not least, Blender has a 3D Printing Toolbox. This toolbox provides a range of specific functions for 3D printing, such as mesh check and repair, wall thickness analysis, and support generation, making it easier than ever to prep your models for printing.
In summary, Blender is an incredibly versatile and powerful tool for anyone interested in 3D printing, thanks to its modeling capabilities and specific features for 3D printing. Remember, using Blender for 3D printing can transform your digital creations into tangible, real-world objects!
Why Blender is Suitable for 3D Printing
High-quality model creation
Blender provides you with a vast range of tools for modeling, texturing, and lighting. You can create incredibly detailed models that can be printed with amazing results. With the right knowledge, you can even create 3D models with realistic textures and details that will be perfectly replicated in your 3D print.
Suitable for various use cases: Blender is an exceptional software for a variety of 3D printing projects. Whether you’re creating a model for an artistic project, engineering, or just for fun, Blender has the tools to help you bring your visions to life.
The learning curve: No doubt, Blender has a rather steep learning curve. However, with the ample amount of resources available, including video tutorials, step-by-step guides, and an active and helpful community, it’s possible to master Blender. Remember, practice makes perfect!

Preparing STL Files and 3D Printing with Blender
Exporting Your 3D Model in STL Format
Ensuring Manifoldity in Your 3D Model for Printing
Common Issues in Preparing STL Files for 3D Printing
Solving 3D Printing Issues with Blender's Tools
Despite the challenges in preparing STL files for 3D printing, Blender offers a wide range of tools to address them. One such example is the “3D Print Toolbox,” available as a free add-on. This tool provides several specific functions for 3D printing, such as manifoldity checks, print area measurements, overhang checks, and more.
Other helpful tools for 3D printing in Blender include the “Boolean” modifier, which allows you to merge or subtract 3D objects, and the “Remesh” tool, useful for fixing your model’s geometry.
In summary, while preparing STL files for 3D printing with Blender requires some practice, it allows you to have full control over the final quality of your model. With the right tools and a good dose of curiosity, you can effectively and accurately bring your ideas to life.
Introduction to the 3D Printing Toolbox
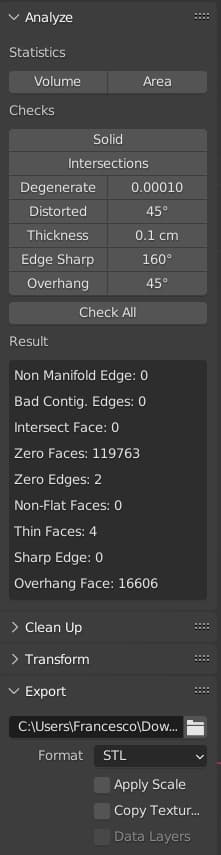
Toolbox Verification Tools
NON-MANIFOLD EDGES

INTERSECTING FACES
DISTORTED OR NON-FLAT FACES
WALL THICKNESS ISSUES
EDGE SHARPNESS EVALUATION
DETECTION OF STEEP SLOPES
Troubleshooting with the Toolbox
CLEANUP DISTORTED
MAKE MANIFOLD
The toolbox’s “Make Manifold” function is a powerful tool that attempts to automatically solve a number of common issues encountered in 3D models. This tool is particularly useful for solving more complex issues that may require significant expertise and time to manually resolve.
“Make Manifold” tries to fix issues like non-manifold edges, intersecting faces, and other geometric inconsistencies that can render a model unfit for 3D printing. Essentially, this tool’s goal is to make the model “manifold”, i.e., to ensure that every edge is shared exactly by two faces, the ideal condition for 3D printing.
It’s important to note that while “Make Manifold” is a very powerful tool, it’s not infallible. It may fail to solve all issues, especially more complex ones, and in some cases it may alter the model in unexpected ways. Therefore, it’s always advisable to carefully check the model after using this function.
In summary, although the process of preparing a 3D model for printing may seem daunting due to the various issues that can arise, Blender’s 3D printing toolbox provides a range of practical tools that can help simplify and automate much of this process. This makes Blender an ideal choice not only for creating 3D models, but also for their preparation for 3D printing.
Model Scaling and Export
Automatic Repair
In some cases, Blender can even automatically repair problems detected during the mesh check. This function can save a lot of time, especially when working with complex models.
All in all, Blender’s 3D Print Toolbox makes the process of preparing 3D models for printing significantly simpler and more intuitive, helping you avoid common mistakes and optimize the quality of your prints.
Course Recommendation: "3D Printing from Zero to Hero in Blender – The complete 3D printing course"
If you’re interested in diving into the world of 3D printing using Blender, you might consider the course “3D Printing from Zero to Hero in Blender.” This highly-rated course, available on Udemy, offers a comprehensive journey covering 3D modeling, slicing, and 3D printing.
Here are some reasons why you might want to check out this course:
- Top-tier Instructor: With nearly 10,000 students, it offers up-to-date and hands-on learning.
- Unique Model Creation: Learn how to design, model, and 3D print your unique models.
- Suitable for All Levels: Regardless of your experience with 3D modeling, this course will quickly take you from beginner to expert.
- Detailed Content: With 7.5 hours of video tutorials, you’ll dive into the details of each 3D modeling project.
To learn more and enroll in the course, click here.
Conclusion
You’ve reached the end of this detailed introduction to Blender for 3D printing. We’ve explored some of Blender’s basic features, touched on specialized aspects of 3D printing, and even shared a course recommendation that could be the next step in your learning journey.
3D printing and modeling with Blender are fascinating and rapidly evolving fields. Whether you’re a curious beginner or have some background knowledge, we hope this article has provided you with a clear idea of what to expect and how to get started.
If you have any questions or wish to delve further, feel free to explore additional resources and courses, like the one we recommended. Happy exploring and happy printing!